You just purchased a G Suite account from Google and have set up your email address in G Suite. Now, you want to change your profile picture. Here’s how you do it:
In your Gmail Account, click on the profile picture icon. It is on the top right corner of the page.
![]()
Then, click on change and change your profile picture.
This looks fairly simple, however, when i did that, I got an error: Sorry! We could not save your profile photo. Please try again later.
If you are getting the same error, then read on and follow the below given steps. I have created a step by step guide to make the necessary changes in your account. This will ensure that you will be able to change your profile picture on your Gmail account as mentioned above.
Here are the steps:
1) Login to your G Suite Admin console. The address must in the welcome email you have received. The URL must be something like: admin.google.com/yourdomain where, yourdomain is your domain for G Suite.
2) In the G Suite Admin console, click on Apps.

3) Then, In Apps Settings Page click on G Suite Gmail, Calendar, Drive & more

4) Now, in Services page, click on Directory on the bottom of the page

5) In Settings for Directory page, click on Profile Editing

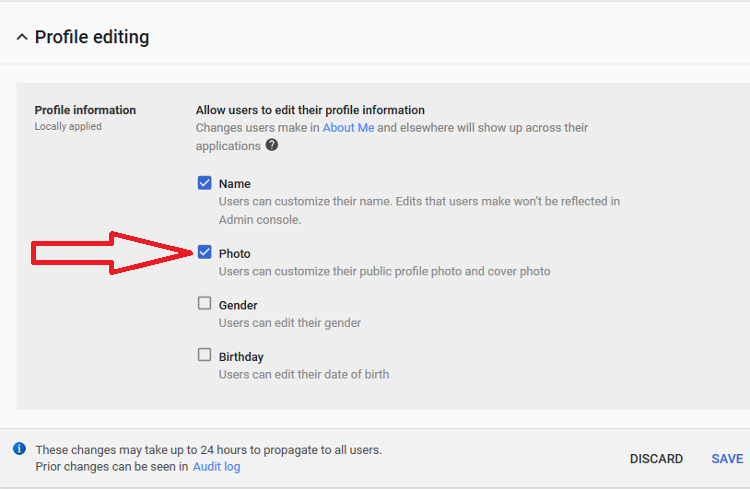
6) In Profile editing section, check the box, Photo: Users can customize their public profile photo and cover photo

You can also check or uncheck Name, Gender, Birthday to let you and your users to change these details in their profile.
Click on Save.
It will say:
These changes may take up to 24 hours to propagate to all users.
Prior changes can be seen in Audit log.
However, I was able to change the picture instantly.
I hope after performing these steps you are also able to change your profile picture by clicking on the profile picture icon in your Gmail account as I have mentioned above.
Enjoy your new G Suite Account! 🙂
This is applicable for gsuite admins only. Is there a way for non-admin users to change their profile pics?
To change profile picture for any user, please follow the below given steps:
1) Login to Gmail.
2) Click on the profile picture icon on the top right corner of the page.
3) Click on Change on the Profile Picture And change your profile pic.
I tried the above. I still get the same problem.
I remember I repeated the steps 3-4 times before the profile picture actually got displayed on the account. Now, the profile pic is not disappearing for my account. I guess you have to try few times to make the profile pic stick on your account. Also, try using Chrome as the browser. Hope it helps!
Thank you! This worked like a charm.
You are very welcome, Britt! 🙂
Thank you it worked!!!!
You are very welcome!
Thank you so much for this!!! What headache. Just another tip! My G suite was not showing me the directory but by searching in for “profile editing” I was able to go straight to the relevant page! Thanks again!
You are very welcome, Frances. I am glad it worked for you! Thanks for the info!
I’ve tried this entire process and even was able to update my G+ profile picture but no luck with G Suite and this is crucial. 🙁
I repeated the process 3-4 times before the profile picture actually got displayed on the account for G Suite. Now, the profile pic is not disappearing for my account. I guess you have to try few times to make the profile pic stick on your account. Also, try using Chrome as the browser. Hope it helps!
Solved a very annoying problem with your instructions, thank you!!
You are very welcome!
Thank you SO much for this! I was getting very irritated with this error message and would’ve never known to look into the Admin settings for the solutions.
You are very welcome, Melissa! I am glad it worked for you!
Thanks!
You are very welcome!
This was excellent. Thank you!
You are very welcome, Carlo!