In this post I will describe a free tool, Twitter Feed which can be used for automatically sharing content in social networks by using RSS feed. You can add your WordPress blog RSS feeds or any other RSS feeds to automatically share content in Facebook, Twitter, LinkedIn, LinkedIn Company Page and App.net. You can set up feeds from the Twitter Feed dashboard and select update frequency, post content format, select a URL shortener service for links, select post sorting options, add post prefix, add post suffix, add keyword filter, include posts with the following keywords, exclude posts with the following keywords and connect the social networks. Whenever the feed is updated and according to the update frequency and other options you have set up, content will be automatically shared in social networks.
Follow the below given steps in TwitterFeed to use RSS feed to automatically share content in social networks:
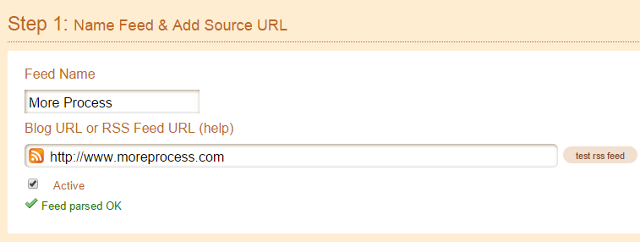
1) Create feed and add feed URL: Click on “Create New Feed” in Twitter Feed dashboard. Enter the feed name and enter your RSS Feed URL or blog URL. Click on the “test rss” feed button to check if your RSS feed is working.

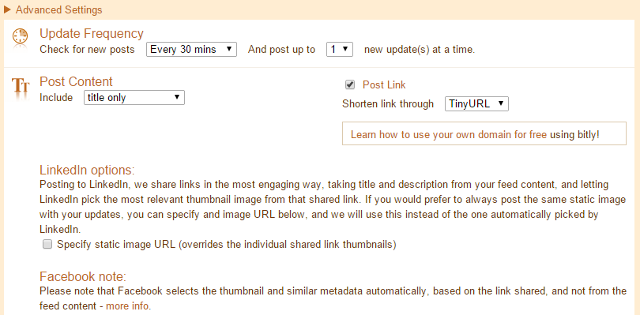
Click on Advanced Settings.
i) Update frequency: Under Update frequency you can check the blog for new posts every 30 minutes, one hour, two hours, three hours, six hours, twelve hours or twenty-four hours. Under “And post up to” you can select to post 1-5 updates at a time.
ii) Post content: Select the post content which you want to share in social networks. You can select Title only, Description and both Title and Description.
iii) Post link: Check option Post Link to posts links with tweets and messages. You can use the following URL shortener services to shorten long URLs: TinyURL, bit.ly, cli.gs, urlborg, chilp.it, krz.ch, migre.me, dot.tk, awe.sm or a custom domain name.
iv) LinkedIn options: Under LinkedIn options, enter an image URL under Specify static image URL. This will be the default image URL for all the links. If you un-check this option then images will selected from the links which are shared.
v) Post sorting: Here you can share new posts based on publication date or GUID. You can select the “pubDate” option here. GUID can be selected for RSS feeds which are unsorted.

vi) Post prefix: You can prefix your tweet with text as per your requirements. You can add a maximum of 20 characters.
vii) Post suffix: You can suffix your tweet with text as per your requirements. You can add a maximum of 20 characters.
viii) Keyword filter: Here, you can set up keyword filters. You have two options:
a) Include posts with the following keywords: You can share posts when the following keywords are included. Check option “Filter your posts by using keywords to auto-approve new posts” and add the required keywords. For Example, if you enter Journal, then only the posts which contain the keyword Journal will be shared in social networks.
b) Exclude posts with the following keywords: You can share posts when the following keywords are excluded. Check option “Filter your posts by using keywords to auto-approve new posts” and add the required keywords prefixed with –. For Example, if you enter –Journal, then the posts which contain the keyword Journal will not be shared in social networks.

ix) Click on “Continue to Step 2”.
2) In Step-2 you can connect your following social networking accounts: Facebook, Twitter, LinkedIn, LinkedIn Company Page and App.net. For Example, I will connect to a Twitter account by clicking on Twitter.

On the next page, you can add select an existing Twitter Account or authenticate a new Twitter account. You also have the option to name this campaign under “UTM tags” and add term and Content tags under Optional tags. Click on Create Service.

3) When you have added all the social networks, click on All Done. You will see a successfully configured a feed message.

You have successfully configured a RSS feed to automatically share content in social networks. You can edit this feed anytime from the Twitter Feed dashboard.
