WP Super cache is one of the best cache plugins for WordPress. This post is a tutorial for setting up WP Super cache for optimum performance. If you follow the below given settings your blog will load faster:
1) Download, install and activate WP Super cache.
2) Then, go to: Settings –> WP Super cache.
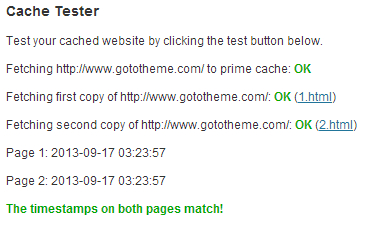
3) Go to “Easy” tab, check option “Caching On (Recommended)” for “Caching”. Click on “Update Status”. You have just turned the basic caching to on. To test it click on “Test cache”. If you get all green color check boxes then caching has been activated correctly:

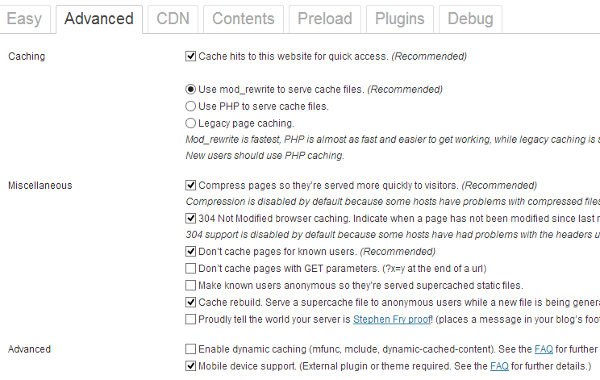
4) Go to “Advanced” tab, Under “Caching”,
i) Check option “Cache hits to this website for quick access. (Recommended)”.
ii) Then, select option “Use mod_rewrite to serve cache files. (Recommended)”
5) Under “Miscellaneous”,
i) Check option “Compress pages so they’re served more quickly to visitors. (Recommended)”.
ii) Check option “304 Not Modified browser caching. Indicate when a page has not been modified since last requested. (Recommended)”
iii) Check option “Don’t cache pages for known users. (Recommended)”
iv) Check option “Cache rebuild. Serve a supercache file to anonymous users while a new file is being generated. (Recommended)”
6) Under “Advanced”, check option “Mobile device support. (External plugin or theme required. See the FAQ for further details.)”
Leave the rest of options as is. When, you are done, it will look like:

Click on “Update Status”.
If you get a message “Rewrite rules must be updated”, then, click on “Update Mod_Rewrite Rules”.
If you see a message “Warning! Garbage collection is not scheduled!”, then under “Expiry Time & Garbage Collection”, enter “Cache Timeout” to 3600 seconds and under “Scheduler”, select “Timer” to 600 seconds. Click on “Change Expiration”.
You can also click on CDN tab, for enabling CDN settings for WP Super cache.
Thank you!
You are very welcome, Sanjay.