This tutorial is about setting up MaxCDN (Content delivery network) in a WordPress blog which is using cPanel in web hosting account and WP Super cache plugin. I recently set up MaxCDN for one of my sites GotoTheme. I believe this tutorial will be helpful for bloggers who are using the below given tools.
Before you proceed, you need to make sure you have the following ready:
1) WordPress blog
2) You are using cPanel in your hosting account.
3) WP Super cache plugin installed
4) MaxCDN account
Step-1: Create a Pull Zone: Login to your MaxCDN account. Click on “Zones” menu at the top. Then, click on “Create Pull Zone” under “Pull Zones”.
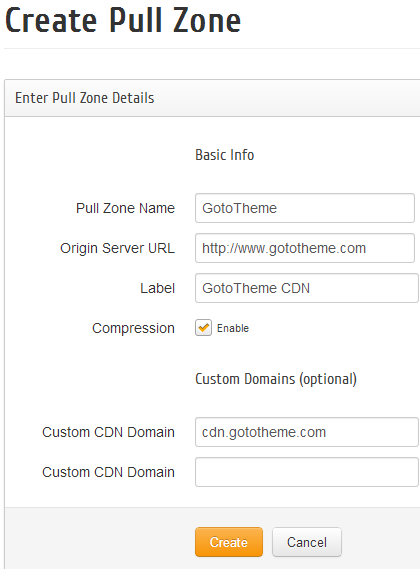
Enter the following:
a) Pull Zone Name: This is the pull zone name. It should be at least 3 characters using letters and numbers and no special characters or spaces.
b) Origin Server URL: Enter your website URL.
c) Label: Description of this zone.
d) Check option “Enable” for Compression.
e) Custom Domains (optional): Custom CDN Domain: The domain for your CDN server will be something like: cdn-name.account-name.netdna-cdn.com. However, you can mask it to your own custom domain. Click on “Create”.
Here’s how I filled it up:
After few minutes, your pull zone will be created. After your zone is created, a message will pop up like this:
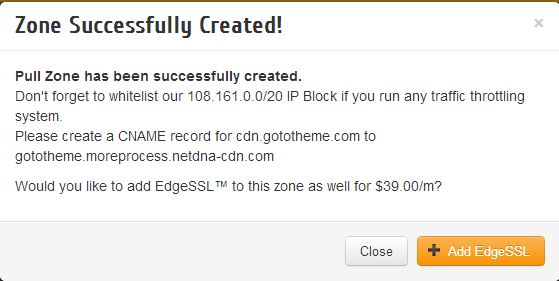
and your Zone configuration page will look like:
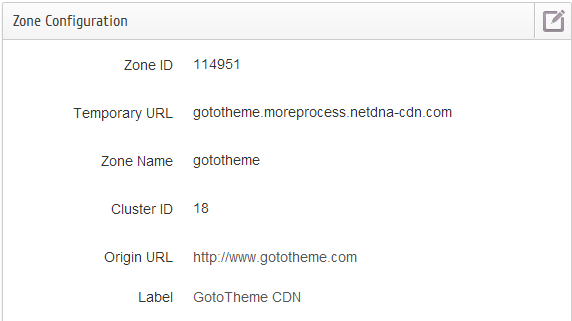
Step- 2: Create a CNAME record in cPanel: CNAME record is created in cPanel to mask the Temporary URL to your custom CDN domain. Login to your cPanel. This will probably be at: www.your-domain.com/cpanel
Click on “Advanced DNS Zone editor” under “Domains”:

Under “Add a record”:
a) Name: Under name type: cdn and click anywhere outside the field. Rest of the things will be automatically filled up. This is the name of your custom CDN domain. For Example: cdn.gototheme.com.
Note: There will be a dot at the end of the custom domain (which is okay).
b) TTL: Enter TTL as: 14400
c) Type: Select “CNAME”
d) CNAME: Copy the Temporary URL you created in Step-1 and paste it here. For Example: gototheme.moreprocess.netdna-cdn.com
After, filling these fields it will look like:
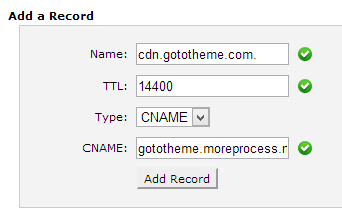
Click on “Add Record”
The record will be added and it will be shown in the same page under “Zone File Records”:

Step-3: Set up CDN in WP Super cache:
Basic configuration: For best results, use the below given configuration of WP Super cache. In your WordPress dashboard go to: Settings –> WP Super cache
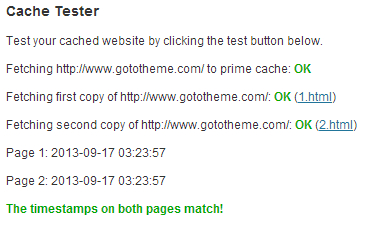
a) Go to “Easy” tab, check option “Caching On (Recommended)” for “Caching”. Click on “Update Status”. You have just turned the basic caching to on. To test it click on “Test cache”. If you get all green color check boxes then caching has been activated correctly:
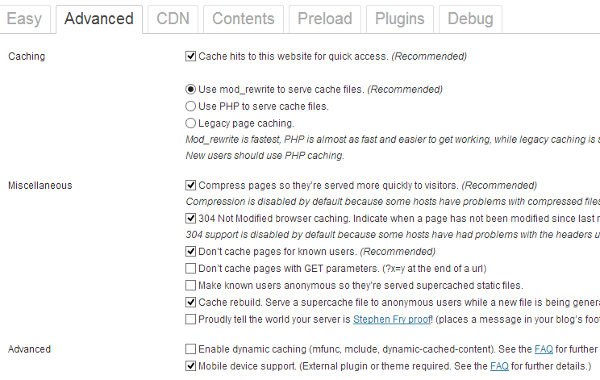
b) Go to “Advanced” tab, Under “Caching”,
i) Check option “Cache hits to this website for quick access. (Recommended)”.
ii) Then, select option “Use mod_rewrite to serve cache files. (Recommended)”
c) Under “Miscellaneous”,
i) Check option “Compress pages so they’re served more quickly to visitors. (Recommended)”.
ii) Check option “304 Not Modified browser caching. Indicate when a page has not been modified since last requested. (Recommended)”
iii) Check option “Don’t cache pages for known users. (Recommended)”
iv) Check option “Cache rebuild. Serve a supercache file to anonymous users while a new file is being generated. (Recommended)”
d) Under “Advanced”, check option “Mobile device support. (External plugin or theme required. See the FAQ for further details.)”
Leave the rest of options as is. When, you are done, it will look like:
Click on “Update Status”.
If you get a message “Rewrite rules must be updated”, then, click on “Update Mod_Rewrite Rules”.
If you see a message “Warning! Garbage collection is not scheduled!”, then under “Expiry Time & Garbage Collection”, enter “Cache Timeout” to 3600 seconds and under “Scheduler”, select “Timer” to 600 seconds. Click on “Change Expiration”.
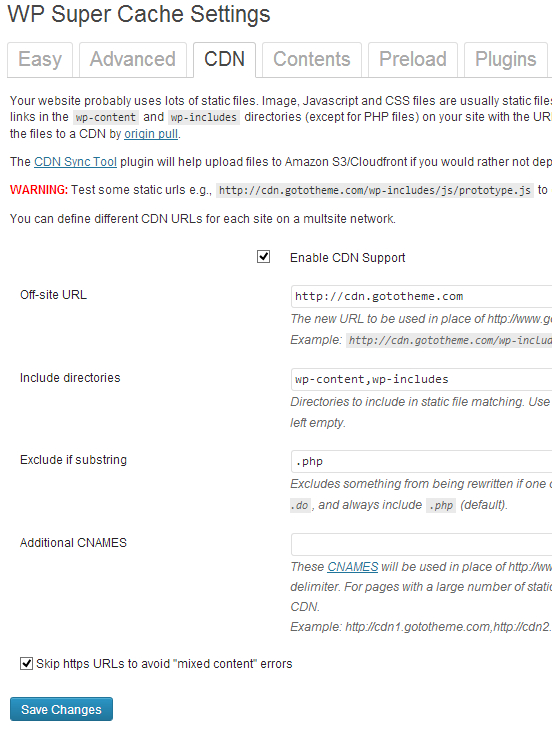
CDN configuration: Go to CDN tab,
a) Check option “Enable CDN Support”.
b) Enter “Off-site URL” as: Enter your custom CDN domain: http://cdn.yourdomain.com (This was created in Step-2) For Example: http://cdn.gototheme.com
c) Check option “Skip https URLs to avoid “mixed content” errors”.
When you are done, it will look like:
Click on “Save Changes”. Go to “Easy” tab, click on “Delete cache”.
Step- 4: Verify if CDN is Working:
Method-1: Check images: Right click on any image of your site and click on “Open image in new tab”. If the image URL starts with cdn. then CDN is working in your site. For Example: http://cdn.gototheme.com/wp-content/images/wordpress-themes/instantqanda-tm9.jpg
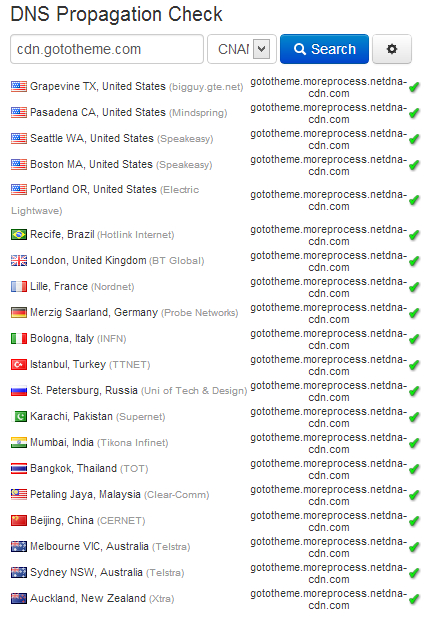
Method-2: DNS Propagation check: Go to: What is my DNS, enter cdn.yourdomain.com (For Example: cdn.gototheme.com), from the drop down menu, select “CNAME”, click on Search. If your CDN set up is working you will see:
Method-3: After few hours, login to your MaxCDN account, click on “Dashboard”, then, under “Content Zones”, click on “Report” for your newly created pull zone. If you see reports, then CDN is activated in your site.
